SDL Wii/installation help
Overview
This is meant as a more detailed guide to getting SDL Wii working under Devkitpro and actually being able to compile successfully, based on my own trial-and-error and advice from #wiidev on EFNet.
These directions target a Windows environment.
First steps
1. Grab the latest version of the devkitpro automatic updater and run it. Choose "keep downloaded files" as it frees you from having to redownload should something go bad with the installation / you screw up the toolchain somehow.
Don't put the toolchain into a path with spaces. I suggest using c:\devkitpro as the installation path.
I chose the following:
- base system (obviously)
- devkitPPC and all suboptions
- devkitARM and all suboptions (I needed this toolchain in order to compile the SVN version of libfat, it needs both PPC and ARM - odd)
- Programmer's Notepad
2. Get an SVN client. I recommend TortoiseSVN as it integrates neatly into Windows Explorer. Install it and reboot.
3. After reboot, go ahead and test the toolchain installation. Open Programmer's Notepad and select File -> Open Projects... - browse to the devkitpro folder, then /examples/wii/template and choose template.pnproj.
Notice that a project hierarchy appears in the Projects window. You will see a makefile and some folders. Inside the folder source is the file template.c.
Remember this folder structure! Why? I intend to use this template makefile when it's time to create my own project, and in order for things to compile properly, this structure has to be followed.
Press alt-1 to make the project. If everything is good, you'll see something like this in the Output window:
> "make"
template.c
linking ... template.elf
output ... template.dol

> Process Exit Code: 0
> Time Taken: 00:03
If not, you'll have some debugging work to do before proceeding.
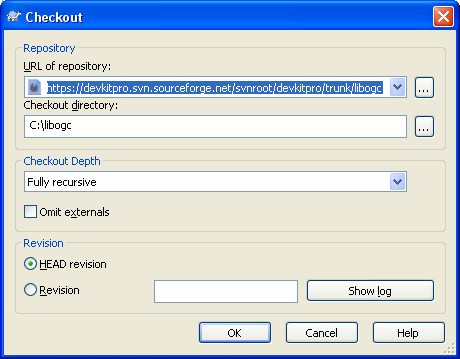
4. Let's grab the latest SVN version of libogc now. Open Windows Explorer. Under File you will see some new menu options. Choose SVN Checkout... and you will see a popup like this:
The repository URL for libogc is:
https://devkitpro.svn.sourceforge.net/svnroot/devkitpro/trunk/libogc
To keep things simple, specify c:\libogc as the checkout directory. Like before, don't use a path with spaces in it. Keep checkout depth as fully recursive and leave Omit externals unchecked. HEAD revision simply means the latest revision, which is what we want. Whack OK and take a break while the sources are downloaded.
